Every genre of car audio enthusiast looks at amplifier performance differently. The SQ guys worry about distortion and noise. The bass heads focus on power. The keyboard commandos and know-it-alls talk about slew rate or something equally irrelevant. Despite all this, an audio system’s frequency response matters the most regarding the perception of quality. The folks at KICKER sent one of their compact KEY200.4 smart amplifiers to check out. Regarding the frequency response of your car audio system, this little monster has a few cool tricks up its sleeve. Let’s check it out!
What Is the KICKER KEY Technology?
Before digging into the KEY200.4 amplifier, we need to discuss KICKER KEY technology. Modern factory-installed car audio systems are getting more and more complicated every year. Even what seems like a basic radio can include equalization, signal delays and all-pass filters. Without an understanding of how this processing works, how to measure it and how to make it go away (if necessary), upgrading a factory-installed sound system might be very difficult.
KICKER designed the KEY product line to simplify upgrading complex audio systems. The KEY line currently has three solutions. The KEYLOC is a line-output converter that can automatically detect equalization, delays, and all-pass filters on the outputs of a factory radio or amplifier. Most importantly, the KEYLOC can undo that processing, providing your installer with a signal that will work with any amplifier to deliver a predictable performance upgrade. Many shops across the country keep a KEYLOC or two on hand for times when other processors fail to undo factory processing.
The KEY500.1 is a 500-watt subwoofer amplifier that offers similar processing. The amp can analyze the signal from your factory source unit or amplifier and then smooth peaks or restore low frequencies to ensure that the bass in your audio system sounds excellent.
Finally, we have the KEY200.4. Unlike the other KEY solutions, this amplifier uses acoustic measurements to improve the performance of your audio system. Let’s dive into the features and functions of the KEY200.4 to learn about its capabilities and performance.
Features of the KICKER KEY200.4
Let’s start with the basics of the KEY200.4. This is a four-channel amplifier housed in a compact extruded aluminum chassis. It would easily fit into the micro-amp size class, allowing it to be installed in the dash, above a glove box, in a center console or under a seat. The chassis is 7.37 inches long, 2.75 inches wide, and only 1.69 inches tall.
From a specification standpoint, each of the four channels is rated to produce 50 watts of power into 4 ohms with no more than 1% THD+N when the amp is supplied with 14.4 volts from the electrical system. The signal-to-noise ratio is specified as being better than -90 dB referenced to rated power. The frequency response is 20 Hz to 20 kHz with a +0, -1 dB tolerance. Input sensitivity is 250 mV to 10 volts so that it will work with any aftermarket source unit and most factory-installed radios.
An important feature of the KEY200.4 is support for vehicles with Stop/Start ignition systems. In many cases, when the engine restarts as you are about to pull away from an intersection, the electrical system voltage can drop to under six volts. KICKER designed the KEY200.4 so that it won’t shut down during these momentary voltage drips.
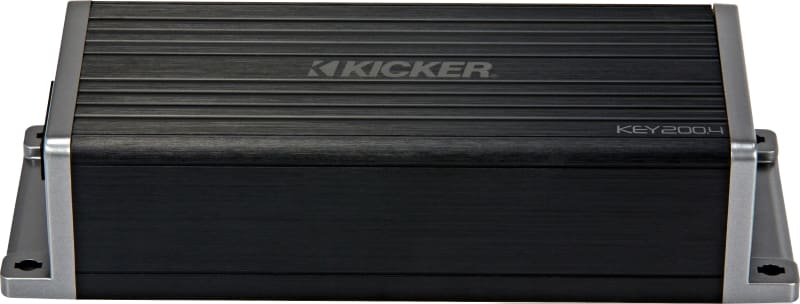
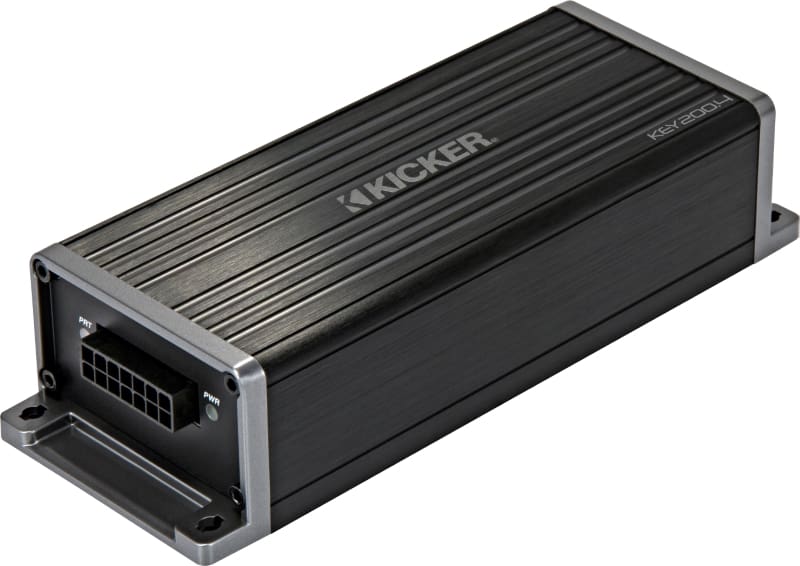
The left side of the amp chassis has a 14-pin Molex connector with pigtails for the four-speaker outputs, power input connections and the remote turn-on lead. The harness has two positive and two ground wires to ensure that the amplifier can get the current it needs from your vehicle’s electrical system. There are also two LEDs on this end panel – one to indicate when the amp is on and a second to let you know if it’s gone into protection.
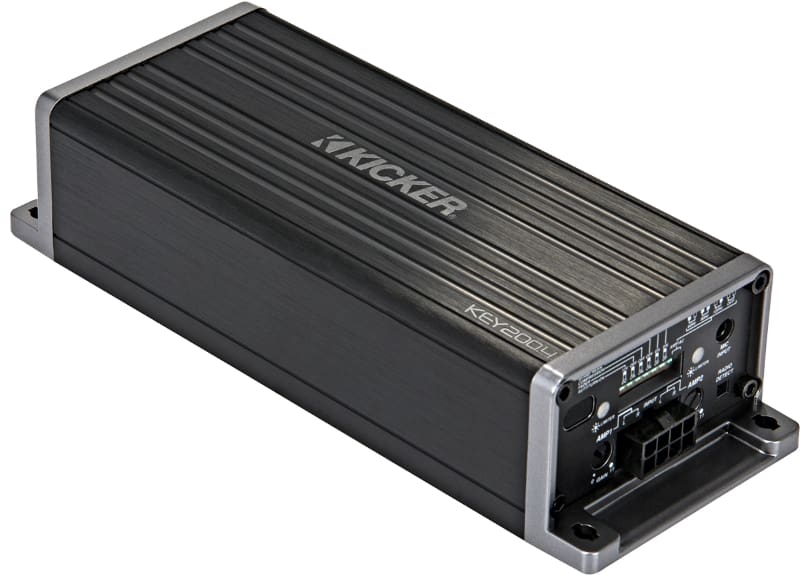
The right-side end panel is the heart of this amplifier. An eight-pin Molex connector accepts audio input signals from the included RCA pigtail harness. Above that connector is a row of 10 very small DIP switches. These switches configure the electronic crossovers and the KEY smart features of the amp. The crossovers have a 24 dB/octave slope with a Linkwitz-Riley alignment and can be set to 60, 80 or 120 hertz.
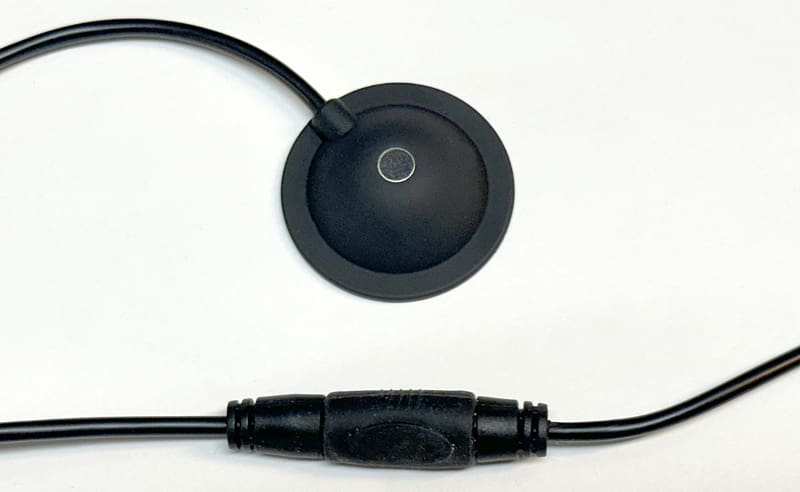
The pair of potentiometers labeled from 0 to 11 serve as the gain controls for the channel pairs. A button labeled Radio Detect adds a 60-ohm resistor in parallel with each RCA input jack, so the KEY200.4 amp will work with factory-installed source units that need to “see” speakers connected to its outputs. Two LEDs indicate when the amplifier’s Limiter circuit engages to make level-setting quick and easy. Finally, there’s a 1/8-inch jack for the included microphone.
KICKER KEY Smart Signal Processing
As we mentioned, the KEY200.4 amplifier can perform acoustic measurements to calibrate your audio system. Once the microphone is in place, it measures the output of the four channels and then applies up to 40 bands of equalization to deliver a smooth and natural-sounding system. It also measures the effective distance to each speaker and can configure delays to make your seating position the “best seat in the house” in terms of performance.
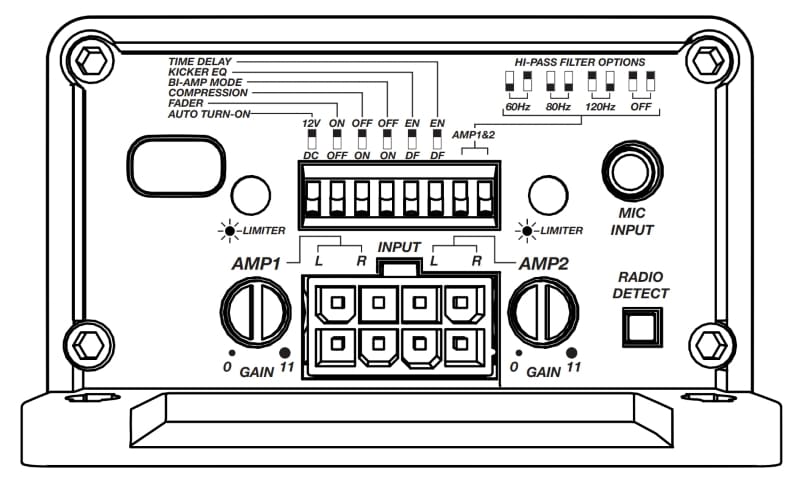
Now that we know the basic capabilities, let’s run through those DIP switches and explain their function. The first switch enables the DC Offset auto turn-on function. If your installer is connecting this amp to a factory-installed radio with no remote turn-on wire, this feature will turn the KEY200.4 on automatically when the radio comes on. Interestingly, the blue remote input wire now functions as a remote output wire to activate other amplifiers in the system. If a remote turn-on wire is present in the audio system, this switch can stay off.
The next switch is the Fader control. When set to On, the four RCA inputs directly feed the four RCA output channels. When set to Off, the front channels, or as KICKER has labeled it, the AMP 1 inputs, feed both AMP 1 and AMP 2. It’s like built-in Y-cables if your application needs them.
The next switch is labeled Compression. When engaged, the digital signal processor in the amplifier will reduce high amplitude signals over a defined threshold to deliver a more consistent listening experience and protect the speakers. Your music will sound great, but you won’t blow your speakers.
Up next is the Bi-Amp switch. Your installer can use the KEY200.4 in two configurations. With the Bi-Amp switch offer, the processing measures and calibrates the system for dedicated stereo front and rear speakers. When Bi-Amp is enabled, the amp is configured to run four speakers in a front-stage configuration. The automatic calibration process detects whether your vehicle has small midrange drivers in the dash or tweeters and automatically sets the crossover points. With woofers and tweeters, both have 3.2 kHz, -24 dB/octave filtering. When midrange drivers are detected, the mids get a 320 Hz high-pass filter, and the doors get a 640 Hz low-pass filter.
The second-to-last switch is labeled KICKER EQ. When off, the target frequency response of the system after calibration will be flat. When set to ON, a bit of bass and treble boost is applied to the signal.
The last switch is labeled Time Delay. When on, the KEY processing will delay the audio signal sent to the three speakers closest to the driver. The result will be that the sound from each speaker in the system arrives at the listening position simultaneously. The result is as if you were sitting equidistant to each speaker, so the imaging and staging will be excellent. If you want to omit signal delay processing, in a case where passengers are always in the vehicle, your installer can leave this off. The calibration process measures the distance to the speakers, so your installer doesn’t need to measure anything.
KICKER KEY200.4 Internal Components and Design
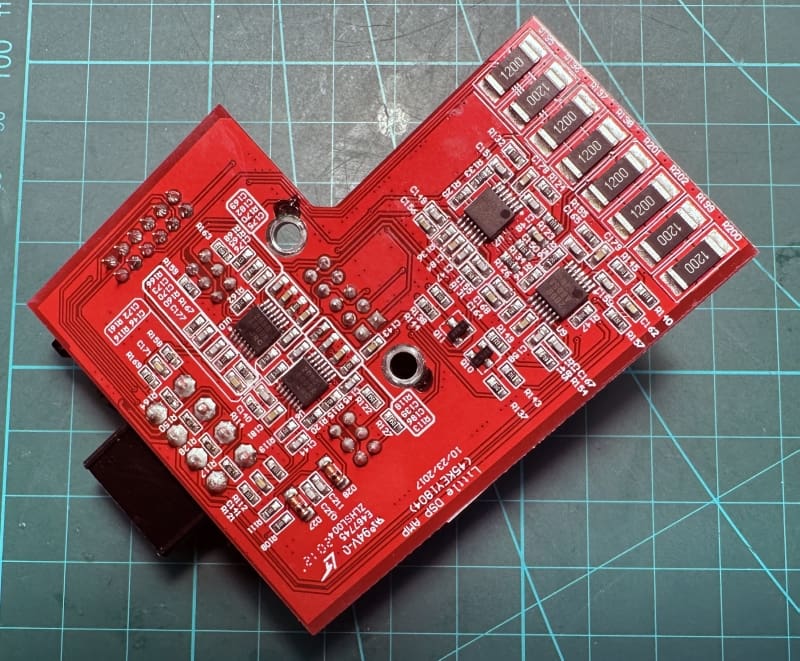
Next, let’s take a little tour through the internals of the KEY200.4. Two circuit boards are visible after removing the end panels and bottom plate. The upper board contains the audio input stage, including the sensitivity controls. The board contains four NJM2060 wide-bandwidth quad op-amps. Eight large 120-ohm surface-mount resistors are part of the FIT2 circuitry that keeps factory radios happy.
Removing the input board reveals the main circuit board with the power supply, amplifier, microcontroller, DSP, ADCs and output filtering. The board is secured to the heatsink with five machine screws. The amplifier is managed by a Microchip PC32MX 50MHz, 32-bit RISC CPU with 128 KB of onboard memory. To put that into perspective, the Apollo Guidance Computer that took the astronauts to the moon in 1969 had only 32 KB of RAM and weighed 70 pounds.
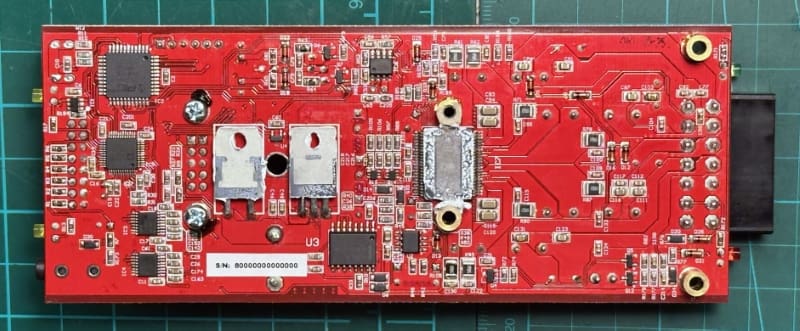
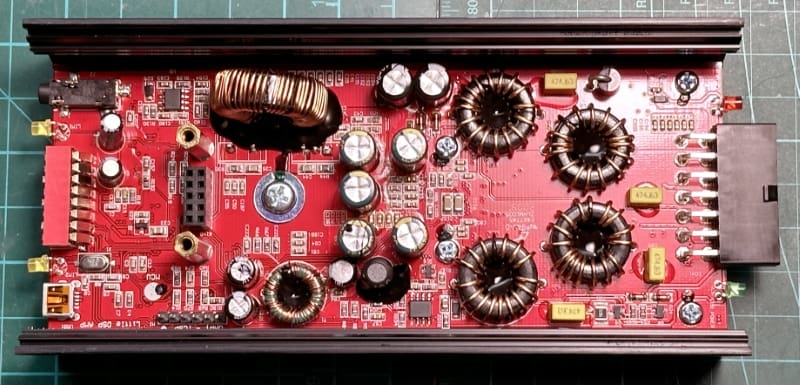
Audio from the input board is converted to digital signals using a pair of Asahi Kasei AK5720VT two-channel 24-bit converters. From there, the data stream feeds into an Analog Devices ADAU1701 SigmaDSP digital signal processor for filtering, equalization and delays. The DSP’s built-in D/A converters feed four channels of audio to a Texas Instruments four-channel Class D amplifier IC in a unique DKE package. The amplifier IC spec sheet identifies it as capable of producing up to 80 watts of power per channel when fed with 28 volts. As such, the 50-watt per channel rating from KICKER is very believable. Back on the top of the main board, we find four large iron-core inductors and accompanying film capacitors to filter any switching noise from the audio signal. In all, the layout is tidy, and the soldering looks to be well-executed.
The KICKER KEY Calibration Process
Let’s discuss how your installer can optimize your audio system using the KEY technology. Let’s use an example of a vehicle with front and rear speakers. Once all the source input and speaker wiring are complete, the installer will place the included microphone on top of the driver’s seat headrest, aiming directly at the ceiling. Don’t fret if that’s not how you see people manually calibrating signal processors; KICKER has considered microphone orientation in their process.
Next, with all the tone controls set flat on your source unit, they will start playing a Pink Noise track. Kicker offers a full suite of downloadable test tone tracks (https://www.kicker.com/test-tones) on their website. Regarding the KEY200.4, you can choose from a 20-minute pink noise track in WAV or MP3 formats.
Once everything is set up, the technician will push the button built into the microphone wire, close the door and let the KEY processor work its magic. The calibration process takes about two minutes and involves a series of blips, chirps, bleeps, tones, and, of course, analysis of the pink noise track. Once done and completed successfully, the system will play a friendly chime. If something goes wrong, a few sour notes play, and then a series of beeps count out an error code. There are six possible errors, each with detailed explanations in the owner’s manual. The whole calibration process takes less time than most technicians need to set up their RTA, get pink noise playing and connect to a stand-alone DSP.
Auditioning the KICKER KEY200.4
A few years ago, I constructed speaker enclosures for a set of 5.25-inch component speakers I developed a few decades ago. I’ve experimented with them and a DSP several times but never really got them to sound stunning. It’s been a while, and I’ve learned a lot about DSP calibration. Nevertheless, I use these speakers with my main computer in my office. With my desk’s layout, I sit in front of the right-hand 24-inch monitor. The speakers flank the monitors, so I am farther away from the left one. While this path length difference isn’t as extreme as sitting on one side of a car, it will be a good test of how well the KEY processing can deal with path length differences.
The KEY200.4 in its Bi-Amp mode is a perfect way to power these speakers. So, I relocated the speaker wires to the KEY200.4’s outputs and fed it a stereo signal from my RME Babyface Pro FS USB interface. I placed the included microphone on top of a lighting stand where my head would be when working on the computer. After starting the pink noise track, I pressed the button on the microphone cable, then stepped away to let the system work its magic.
After some enjoyable beeps, chirps, clicks, and a round of soothing pink noise, the system beeped error code four. A quick look in the manual reports that I might not have the pink noise playing loudly enough. I upped the volume a few notches and repeated the process. Voila, I got the happy little chimes in just a few minutes, indicating that the calibration process was completed successfully. The takeaway: The pink noise, must be a bit louder than what might be deemed “listening level.”
OK, so how did the KICKER KEY processing do? I listened to over a dozen tracks to evaluate the tonal and special characteristics of the resulting system. Let’s start with a technical analysis. The 7-Snare track on the IASCA disk was recreated with very good precision, including its slightly off-center focus. The first three and last three snare hits were evenly spaced from the far left to left of center and from the right of center position to the far right. The fourth hit was slightly larger and placed directly in front of me. That’s a solid 9/10 performance.
Next, I played “Spanish Grease (Dorfmeister Con Madrid De Los Austrias Muga Reserve Mix)” by Willie Bobo. I anxiously awaited the 38-second mark in the track to hear how it would handle the processed repetition of the word “Get.” Sure enough, it panned from the right speaker, forward toward me to be in line with my listening position, left across the soundstage, then back to the left speaker and over to the right again to repeat. The typical benchmark for getting this track right is having the sound extend forward from the speakers to the seating position. That’s a 9/10 in terms of imaging performance! Why not 10/10? One amp that passed through the lab put the voice behind the listening position. That was pure audio voodoo!

Satisfied with the imaging capabilities, I focused on the system’s frequency response. Up first was “Yellow Flicker Beat” by Lorde. Making her voice sound natural, especially the humming at the beginning of the track, is easy to get wrong. Well, the KICKER KEY200.4 got it right. Her voice was smooth and natural, with no unwanted emphasis anywhere. As actor Kim Chan would say, “Bloody marvelous!”

Next, I listened to “Bela Lugosi’s Dead” by Bauhaus. I happened to stumble across the track on my music server, and it seemed like a nice change from the regular options. The percussion through the introduction was nicely focused and had a very good attack. The bass guitar was impressively detailed, and the main electric guitar had a nice edge. I have never listened to this track from a technical perspective, and it’s pretty neat. It sounded great when powered by the KEY200.4.

I listened to New Order’s “Blue Monday” and Frankie Goes to Hollywood’s “Two Tribes (Annihilation Mix)” to get a sense of how tight the bass was. A set of 5.25-inch bookshelf-style speakers doesn’t kick the same way as when there’s a sub in the system. Nevertheless, the percussion snap from both tracks was well-controlled and impressively detailed.

The last track was Tool’s “Chocolate Chip Trip.” This is another funky track with lots of special effects. It evolves into some phenomenal drumming by Danny Carey. Aside from the tonal balance, I’m listening for the timing from the left and right speakers to be aligned so the sound from the snare, floor toms and kick drums are tight and controlled. There were no issues here; everything was aligned nicely. The panning during the intro was buttery smooth and seemed to extend slightly beyond the right speaker. Epic!

In short, the KEY200.4 did a phenomenal job setting up the speaker system. There was no audible transition from the woofers to the tweeters, and not only were the left and right channels matched extremely well, but the overall tonal balance was sublime. Recreating this manually with a microphone system and stand-alone DSP would take a good amount of training and experience. It should be no surprise that pushing a single button is MUCH easier. Kudos to KICKER for their work on the automated calibration process.
Does the KEY200.4 have the same grunt that a full-sized amplifier does? No. However, the smooth frequency response is far more beneficial in creating a system that is perceived to sound good. If your installer is adept at configuring and calibrating a digital signal processor, you will get more from a stand-alone DSP and a more elaborate amplifier. That said, you’ll likely pay at least four times as much. In terms of value, if 50 watts of power is enough for your listening preferences, this will be tough to beat.
Lab-Testing the KICKER KEY200.4
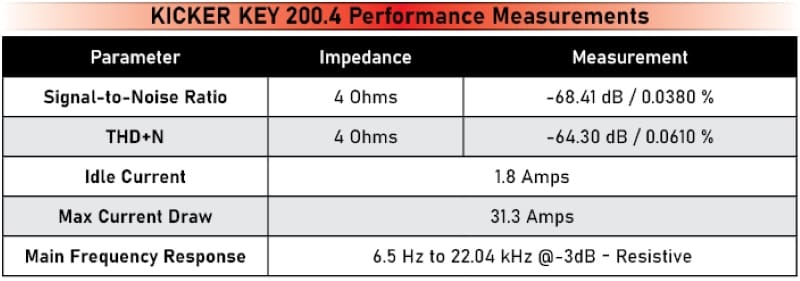
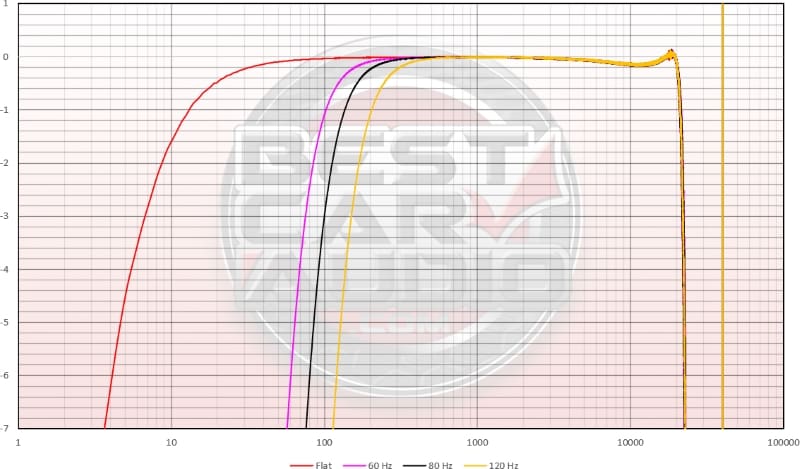
After the listening session, I reset the DSP in the KEY200.4 and set it up on the test bench. The first measurement I took was frequency response. The amp was nice and flat, with the -3 dB point at 6.5 hertz on the bottom and 22.05 kHz on top. Next, I measured the three built-in high-pass crossovers to evaluate their accuracy. Since the processing for the crossovers is handled in the DSP, the cutoff frequencies were very precise. I saw -6 dB right at 60, 80 and 120 Hz. KICKER notes in the owner’s manual that the crossovers have -24 dB/octave Linkwitz-Riley alignments. What I measured matched that description perfectly.
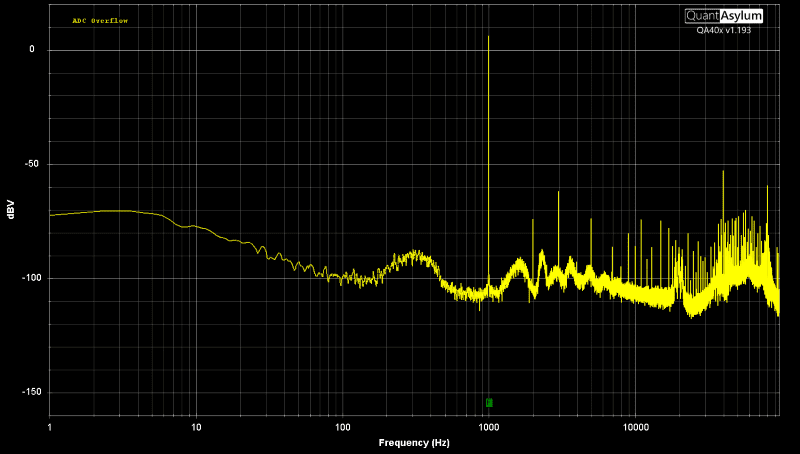
Next up, I did some distortion analysis. The first measurement was with a 2-volt, 1 kHz test tone. This output level equates to 1 watt of power to a 4-ohm load, the standard for CTA-2006-D compliant measurements. I measured a THD+N of 0.061%, with the third harmonic being the loudest at -67.92 dB. The second and fourth harmonics are fairly equal at levels of -80 dB relative to the fundamental test frequency. The signal-to-noise ratio (SNR) was measured at -68.41 dB relative to 1 watt.
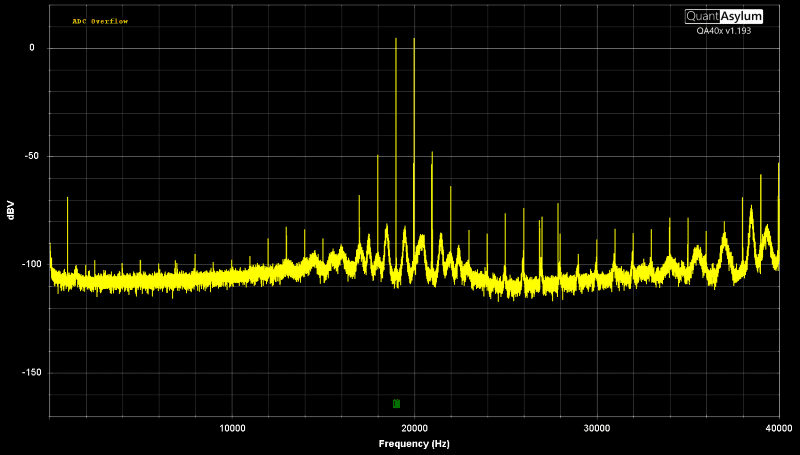
The last distortion test was to evaluate Intermodulation Distortion using 19 and 20 kHz test tones. The KEY200.4 faired well on the 1 kHz product, with the level being at -73.4 dB, or an equivalent to 0.0214%. The sidebands were higher at -54.1 on the low side and -52.6 at 21 kHz. Overall, all of these numbers are good for a compact amplifier.
Last, I measured the power output capabilities of the KICKER KEY200.4. Kicker rates the amp as capable of producing 50 watts per channel with 14.4 volts at the power connections. With all four channels driven, I measured 42.1 watts with 12.54 volts at the amp, then 49 watts with 13.71 volts. Another 0.7 volt would easily allow the amp to produce more than its rated 50 watts per channel. The amp didn’t get upset in any way during the power testing.
Two last notes on the KEY200.4 before we wrap this up. I left the amp disconnected from my power supply for 24 hours to test whether the calibration would remain intact. Sure enough, when I reconnected the amplifier, all the settings remained the same. Finally, KICKER backs the KEY200.4 with a two-year warranty against manufacturing defects when purchased from an authorized retailer in good standing.
Summarizing the KICKER KEY200.4 Smart Amplifier
If you’ve been a long-time reader of BestCarAudio.com, you know that frequency response is the most crucial aspect in defining the quality of any audio system. While evaluating distortion characteristics and other lab measurements is fun, those are secondary to ensuring that your music sounds accurate. The process of configuring and calibrating an audio system isn’t easy. Well, it usually isn’t, unless you have a KICKER KEY200.4 installed in your vehicle.
Have an authorized KICKER dealer install the amp, place the microphone, and then hit the button to begin the automatic calibration process. The KICKER KEY processing works magic to create an audio system that will sound great with any music. It will have excellent staging and imaging, making performances seem impressively lifelike. The KEY processing produces better results than many high-end and competition-level audio systems I’ve evaluated over the years.
If you are shopping for an amplifier that will allow you to play your music at higher volume levels and bring realism and accuracy to your audio system, I can’t think of a better solution for the money than the KICKER KEY200.4. You can find a local authorized KICKER retailer using the Dealer Locator on the KICKER website. Be sure to follow KICKER on Facebook, Instagram and YouTube to learn more about the amazing car, marine and motorcycle audio products they offer.

