
Our Car Audio Masterclass series offers a comprehensive introduction to the essential concepts of car audio systems, covering everything from basic terminology to advanced measurement techniques. To learn more, check out the other articles in the series:
- Car Audio Masterclass 101.1 – Audio Basics: Learn key audio terms and concepts.
- Car Audio Masterclass 101.2 – Understanding Basic Electricity: Explore voltage, current, and resistance.
- Car Audio Masterclass 101.3 – Electric Circuits: Understand series and parallel circuits.
- Car Audio Masterclass 101.4 – Magnetism: Discover the role of magnetism in speakers.
- Car Audio Masterclass 101.5 – Direct and Alternating Current: Compare DC and AC currents.
- Car Audio Masterclass 101.6 – AC Calculations: Dive into AC waveform calculations.
- Car Audio Masterclass 101.7 – The Decibel: Learn about decibel measurements.
- Car Audio Masterclass 101.8 – Speakers, Power, and SPL: Understand speaker power and sound levels.
- Car Audio Masterclass 101.9 – Time and Frequency Domain Measurement: Explore frequency and time measurements.
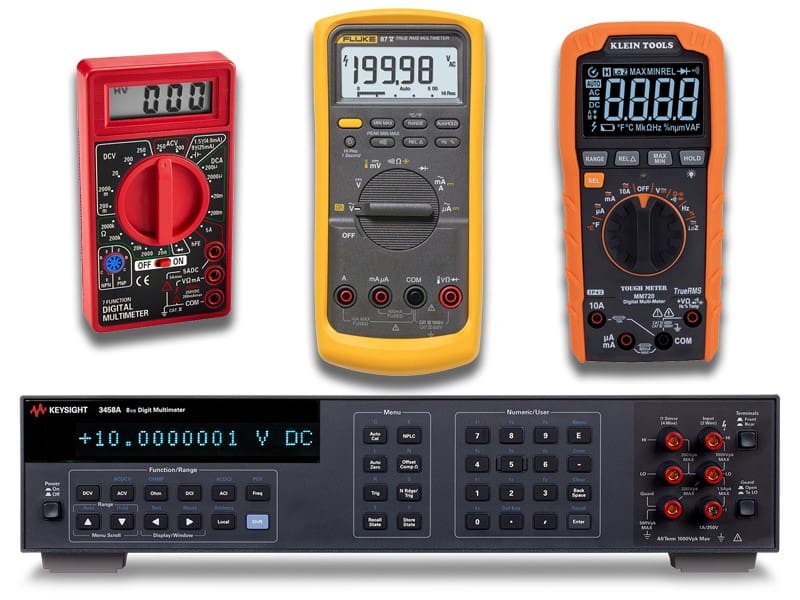
The final lesson in Car Audio Masterclass 101 will explore the common functions of a digital multimeter. Whether it’s a $6.99 meter from Harbor Freight in your kitchen drawer, a Fluke 87V used by professional installers in a shop, or a NIST-traceable Keysight 3458A on a lab bench, being able to measure voltages, current, and resistance is crucial. From checking a fuse to measuring current, understanding what’s happening with any electrical device requires accurate information. Let’s take a close look at the digital multimeter.
Electrical Measurement Devices
Imagine living in the late 1800s as electricity was being installed in homes. You would have transitioned from candles and lanterns to light bulbs to see after dark. To develop, install, and service these newfangled systems, technicians needed to know when voltage was present on a pair of wires. Edward Weston invented the first voltmeter—a device that measures voltage—back in 1884.
The first voltmeters measured current flow through a precise resistance. More current flow meant more voltage. The resistance values in voltmeters are typically very high so that the device’s presence in the circuit doesn’t affect the circuit’s function. An analog meter might have an effective internal resistance of 20,000 ohms per volt in DC mode and 9,000 ohms per volt in AC mode. By contrast, a multimeter like the Fluke 87 has an internal resistance of about 10,000,000 ohms for AC and DC readings.
What Is a Digital Multimeter?
A multimeter comprises three essential parts. The display, usually an LCD screen, shows the measurement. In the middle, we have a knob that lets us select the type of measurement we want to make. Finally, at the bottom, there are several test probe connection points. Inside the meter, a dedicated integrated circuit specifically designed for multimeters typically handles the measurements.
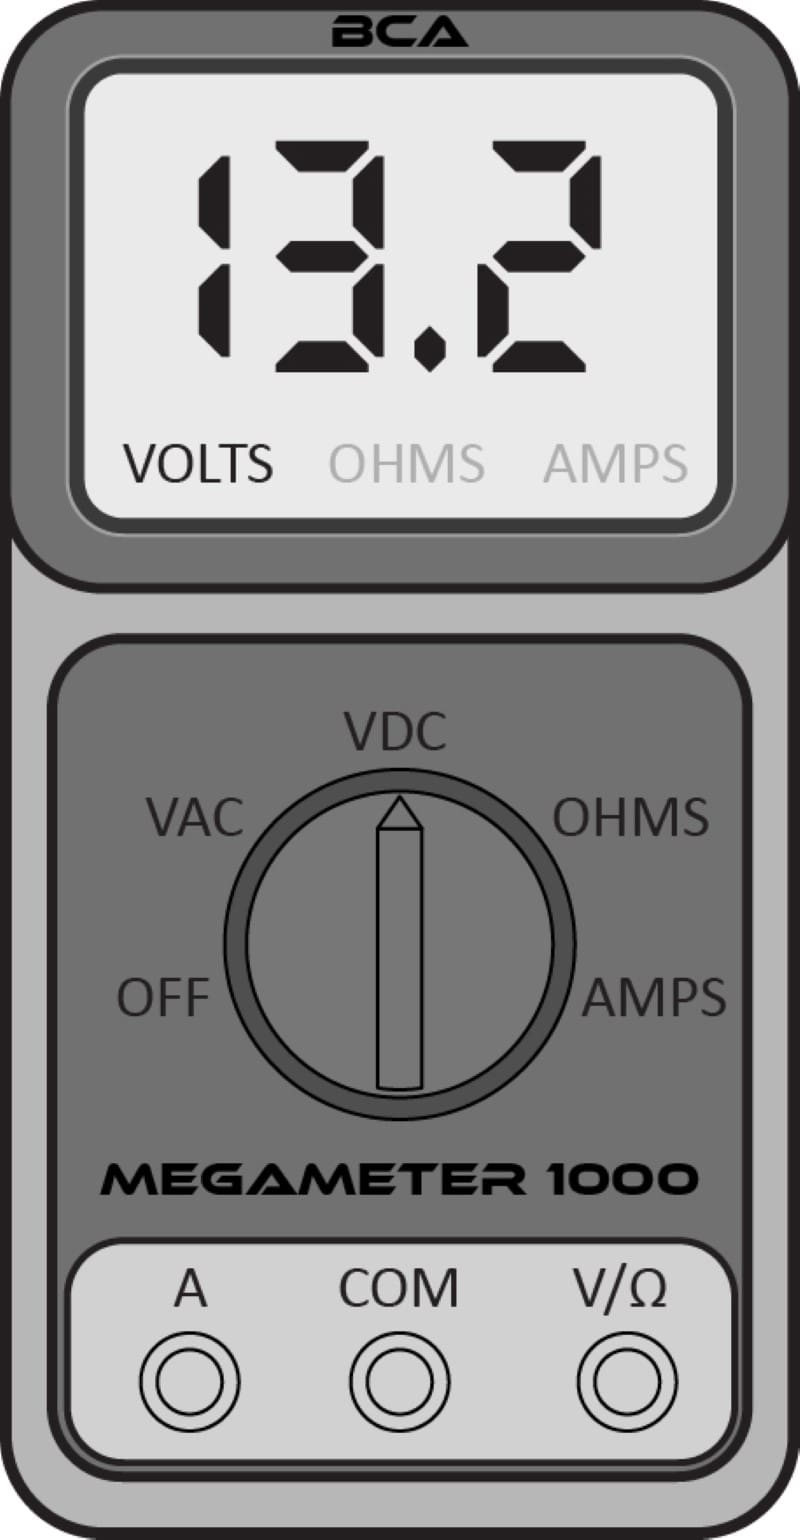
Most modern multimeters offer dozens of features, but we will focus on measuring voltage, resistance, and current flow. The BCA Megameter 1000 below has AC and DC voltage measurement functions, resistance, and current measurement capabilities.
Measurement Ranges
Depending on your meter quality, you might need to know what you intend to measure before you start.
In the case of voltages, the first step is knowing whether to measure an AC or DC voltage. If you are measuring a home’s electric system, those are AC voltages. If you are hoping to estimate the output of an amplifier, that’s also an AC voltage. Measuring supply voltages in a vehicle’s electrical system will typically be DC. Next, we need to know how high the voltage is. With an inexpensive meter, each measurement will have a range of voltages, and the label on the meter will represent the highest voltage that can be displayed.

If you aren’t sure what you might measure, start with the meter in a range higher than you need. While this is a leftover from the days of analog meters, it remains a good practice.
Picking a Measurement Range
For example, if we want to measure the voltage at a wall outlet in our home or office, we’d set the meter to the 600 V AC range on the far right. If we want to measure the voltage of a car battery, then the 60 V DC range is the best choice. The 6000m marking refers to 6000 millivolts (mV), which is six volts. This would be a good range for measuring the voltage of an AA or AAA battery.
Higher-quality meters offer auto-ranging circuitry. You select the measurements you want to make, and then the meter auto-ranges itself to display as much detail as possible. If you want to know if there is 120 volts in a wall outlet and don’t care about the precise measurement, this doesn’t matter much. However, an electrician looking for a ground issue will want to know if you have 112, 121, or 135 volts.
Meter Counts and Digits
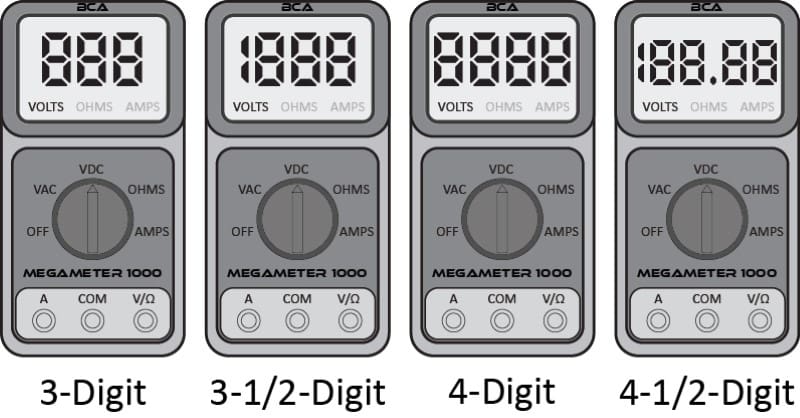
Aside from sheer measurement accuracy, one factor that separates an entry-level meter from a fancy one is the information available on the display. For example, an inexpensive meter like the red one from Harbor Freight shown in the collage above is described as a three-digit display. Any of the three numbers can be any number from 0 to 9. The yellow Fluke meter is a 4-1/2-digit display. The right three numbers can be any digit, and the left number can be off or a 1. The Klein meter is a four-digit display.
Aside from automatic range adjustments, higher-quality and more accurate meters can offer more information. A low-cost meter might be listed as a 1999-count device. This means it can display up to 1999, 199.9, 19.99, or 1.999 volts as the maximum in each range. A 6,000-count meter can display 5999 on the display. Meters are available in 2000, 3200, 4000, 6000, 20000, and even 50000 counts.
Depending on your desired accuracy, pick a meter with the right display and a suitable number of counts for your application.
Overvoltage Installation Category Ratings
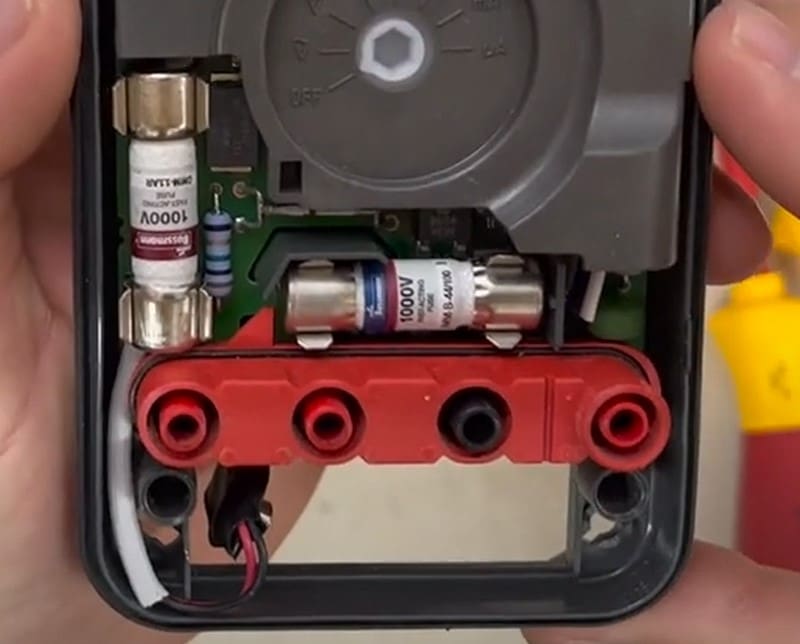
Unless you bought your multimeter at Dollar Tree, you should see a label near where the test leads connect that describes the unit’s Overvoltage Installation Category Ratings. Using meters with high voltages can cause energy to jump from component to component inside the unit, putting the user at risk. If you are an electrician working with residential voltages or are working on cars and trucks, this is unlikely to be an issue. However, new hybrid battery systems can operate at 800 volts DC. That’s more than enough to be very dangerous if mishandled.
Good-quality meters have voltage and CAT ratings to inform the operator where and when to use the device. The CAT rating system uses Roman numerals, going from I to IV. Here is an overview of the different CAT ratings provided by the www.flir.com website.
- CAT I describes secondary circuits not intended to be connected to the mains electricity supply, such as electronics—including a typical laptop PC—and circuits powered by regulated low-voltage sources.
- CAT II is defined as local-level electrical distribution, such as a standard mains socket and plug-in loads. This category includes household appliances like washing machines and portable plug-in power tools.
- CAT III references a building’s electrical installations, including circuit breakers, wiring, switches, and industrial equipment.
- CAT IV involves the source of the low-voltage power installation, essentially the power grid infrastructure, such as underground utility vaults or outdoor power lines.
In other words, the CAT ratings are precautionary indicators that let you know where to use a multimeter. For regular car and truck work, CAT I is fine. However, if you are working on a hybrid vehicle and have appropriate training, then CAT III is likely a good choice.
Maximum Voltage Ratings
Meters have additional ratings for the maximum voltage they can work with or be exposed to. The red Harbor Freight meter in the collage above is rated for 250 VDC or VAC. This likely isn’t safe for use in any hybrid vehicle. The Fluke 87 V and Klein MM720 meters have two ratings. The meter is rated for 1000 volts when used in CAT III applications and drops to 600 volts when used in CAT IV applications. The difference here is the risk of encountering a transient over-voltage condition. Less risk translates to a higher rating. The International Electrical Commission (IEC) sets different CAT and voltage rating standards.

Making DC Voltage Measurements
We’ll start our discussion by examining how to measure a DC voltage. First, we have to connect the test probes to the meter to make a measurement. Here, the black test lead connects to the common terminal in the middle of the Megameter 1000. This will be the consistent connection point for this lead for all types of measurements. The red lead connects to the voltage and resistance terminal in the bottom right corner.
As a best practice, you should start every new measurement session by thinking about and checking where the leads are connected. Why this is important will become clear later in the lesson.
Next, we want to set the meter to the type of voltage we wish to measure. For this demonstration, we will simulate checking the voltage at the power terminals of a car audio amplifier. As such, we want to select the DC voltage setting. If your meter doesn’t have auto-ranging, pick the 60—or 20-volt DC range.
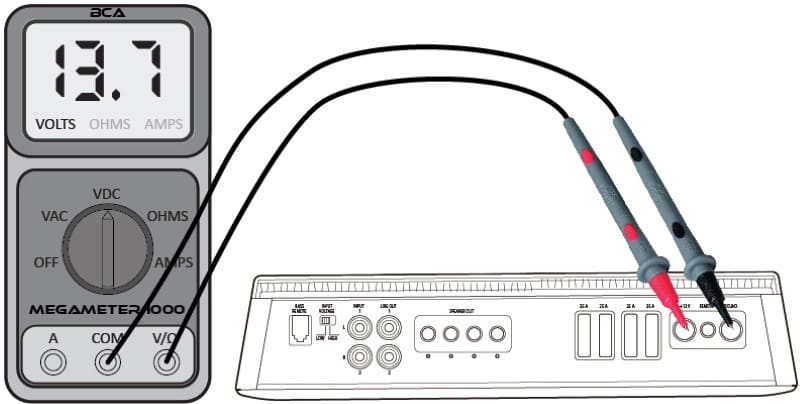
The meter’s display shows the voltage at the amp’s power connections. We can also test for voltage at the remote turn-on terminal by moving the red test lead to that connection. If a car audio amplifier doesn’t produce music, these are the first measurements to make.
Measuring Resistance
The second type of measurement we can make is resistance. This is a little more complicated than voltage because the test conditions matter.
In reality, a digital multimeter (DMM) doesn’t measure resistance directly. It passes a tiny current through the device you’ve connected to the leads and then measures the voltage across it. From there, it calculates the resistance.
Because current flow matters, we often can’t get an accurate measurement of a component when it’s in a circuit and even less likely when the circuit is powered on. The operation of the circuit itself makes the measurement invalid. As such, for this lesson, we will only discuss measuring the resistance of a device or component not in a circuit. An example of this would be measuring the resistance of a speaker voice coil.
Step one is to ensure the test leads are connected to the Common and Voltage/Resistance ports. Second, we set the meter to the resistance measurement range, often represented by the Greek symbol Omega. Next, touch the leads to the ends of the device, which are, in this case, the terminals on a speaker.
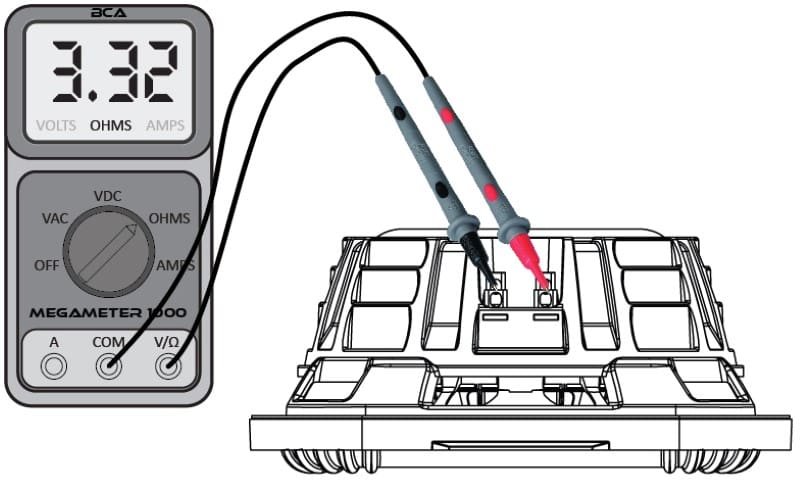
Here’s a little trick for measuring resistance: Before you connect the leads to the device you want to measure, short them together. The meter should read something low. Two ohms is typical for an inexpensive meter, but a good meter might read less than one ohm. Most handheld DMMs may not be accurate at very low resistances. A digital multimeter isn’t the correct tool if you are trying to sort a set of current shunt resistors. If you are trying to measure the resistance of a ground connection, a DMM is the incorrect tool.
Precautions for Making Current Measurements
Perhaps the most complicated measurement someone working on a vehicle or car audio system will want to make is to measure the current flowing through a device. Typical handheld multimeters can often measure up to 10 or maybe 15 amps of current. Above these levels, a clamp-on ammeter is a better and safer choice.
Unlike voltage and resistance measurements, measuring the current flowing through a device requires connecting the multimeter in series with that device. We must also move the red test lead to the current (A) terminal. Some meters have two terminals. The Harbor Freight meter has a 250 mA and 5 Amp connection. The Fluke 87 V has 400 mA and 10 Amp connections. Always start on the higher range if you aren’t sure which to use. More importantly, understand how much current you might measure. A car audio amplifier will likely draw more than ten amps of current. This will blow the internal fuse in the meter. The fuses are somewhat pricey, so you will want to avoid that.
Similar to how a DMM measures resistance, a multimeter measures the voltage across a very small known resistance to calculate current. The internal resistor has to be very small so as not to add resistance to the circuit, which will affect its functionality.
CURRENT MEASUREMENT WARNING
This is important: Never connect your meter to a voltage source when the test lead is connected to the current measurement port. In this configuration, the meter will act as a dead short, and nothing but the resistance of the test leads will limit the current flow. Thankfully, most good-quality multimeters have quick-blow fuses to protect the power source and the meter from damage due to incorrect connections.
As soon as you are done making a current measurement, switch the red lead back to the voltage / resistance terminal.
Making Current Measurements
What if we want to know how much current an LED light bulb draws? First, we’d connect the bulb’s positive terminal to the positive power source. Next, we’d connect the red lead from the multimeter to the bulb’s ground lead. Finally, we’d connect the black lead from the meter to the power supply ground terminal.
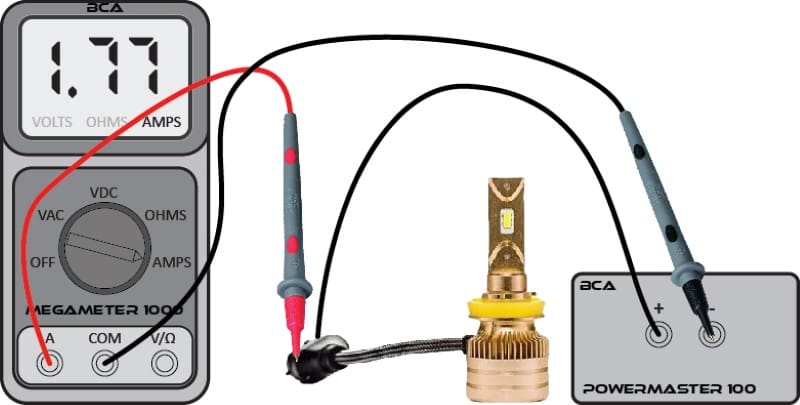
When everything is correct, the bulb lights up, and the meter shows the current flow. However, if the LED bulb doesn’t light up, you may have connected it backward. Additionally, if the meter shows a negative current reading, the leads are likely reversed. If you hear a pop and nothing happens, you’ve probably connected the leads across the power supply and blown the fuse. Replacing the fuse costs around $13.00 plus taxes and shipping from Digi-Key or Mouser. Always use a fast-blow fuse instead of a standard car audio fuse.
Every Car Audio Technician Needs a Digital Multimeter
Modern multimeters have dozens of additional features. We will examine some more complicated measurements in subsequent courses. For now, this basic understanding is adequate to keep even amateur installers out of trouble and help them diagnose issues they might encounter.
That’s the end of Car Audio Masterclass 101. We sincerely hope you learned much about the physics and science underlying car audio systems. As always, if you are interested in upgrading the audio system in your car or truck, visit a local specialty mobile enhancement retailer and ask for their assistance in designing, integrating, configuring, and calibrating an audio system upgrade.
